

Disclosure: some links below are affiliate links, which means I'll earn a tiny percentage of a purchase you make through them, at no additional cost to you.
It's March! Hopefully everyone's allergies aren't too bad. In New Mexico, allergies typically start up in February, when the juniper starts waking up. This winter was a bit unique though. It didn't seem to get cold enough for whatever I'm allergic to to go to sleep so...I've now had mild allergies for over 365 days straight! Neat!

But anyway. I'm here to deliver a special March gift: a free crochet pattern! Once again my naming skills are on full display, as I've called it my "bowtie bunny." Truly, it's a talent I was born with.

So this bunny has existed as a sketch in an old pattern notebook for several years, and I thought it was finally time to bring him to life!
Is he wearing a onesie with ear accessories? Is his fur just colored like this naturally?

The world may never know.
Supplies
- Worsted (weight 4) yarn in 3 colors. I used Brava from WeCrochet in cornflower, white, and black.
- 3.5mm hook
- Eyes. I used some 8mm safety eyes.
- Sewing needle & thread for embroidering the nose & mouth
- Yarn needle
- Stuffing
Abbreviations
ch = chain
st = stitch
sl st = slip stitch
sc = single crochet
inc = increase
dec = decrease
* * = repeat the pattern from * to *
NOTE: sc x 3 means do 1 sc into the next 3 st. Likewise, inc x 3 means do an inc into the next 3 st.
Construction
First make the head. Then you'll make the legs/arms and a connector piece. You'll sew the legs to the connector, then continue crocheting as one piece. After, you'll make the face, stuff the head and body, then sew the head and body together. Finally, you'll make the ears, and bowtie, then sew them on (plus the arms).
I've used joined rows for all pieces, which is worked as followed:
End every row with a sl st to the first st of the row.
Start each new row with a ch 1 (doesn't count as st)
Feel free to use joined OR endless rows, whichever you prefer.
Head
With white, make a magic ring of 6 sc
R1: sc inc entire row (12)
R2: sc, sc, inc x 3, sc x 3, inc x 3, sc (18)
R3: sc x 5, inc, inc, sc x 7, inc, inc, sc, sc (22)
R4: sc x 6, inc, inc, sc x 9, inc, inc, sc x 3 (26)
R5: sc x 7, inc, inc, sc x 11, inc, inc, sc x 4 (30)
R6: sc x 8, inc, inc, sc x 13, inc, inc, sc x 5 (34)
R7: sc x 9, inc, inc, sc x 15, inc, inc, sc x 6 (38)
R8: sc x 10, inc, inc, sc x 17, inc, inc, sc x 7 (42)
R9-R17: sc entire row (42)
Finish off. Leave a long tail for sewing to body (a foot is good)

Legs and Arms (make 4)
With white, make a magic ring of 6 sc
R1: *sc, inc* 3 times (9)
R2-R4: sc entire row (9)
Switch to blue
R5-R6: sc entire row (9)
Legs: finish off with a 4 inch tail. Stuff fully.
Arms: finish off with a 6 inch tail. Only stuff the very bottom "hand" (the starting tail is probably enough)

Leg Connector
With blue and a starting tail of 6 inches, make a foundation row of 15 sc. Or you can ch 15, ch 1 turn, then do a row of 15 sc.
R1-R2: ch 1, turn. sc entire row
Finish off with a 6 inch tail.
Use the tail on each side of the leg connector to sew to each leg. Count the short sides of the connector as 3 st, and sew into 3 st of each leg. Position the legs so that the final stitch of each, with the tail, is sewn to the connector. Once sewn, tie the leg connector tails to the leg tails, then shove the ends into the legs to use as stuffing.


Body
Insert your hook into the middle back of the leg connector and that's where you'll start the body rows.
R1: sc entire row (6 st into each leg, 15 st on both sides of the connector - 42)
R2-R10: sc entire row (42)
Finish off and leave a short tail (shove it into the body when you stuff it)


Make the face
Insert/sew on/glue on your eyes and embroider the face. Feel free to copy mine, or do your own thing!

Stuff and sew the head & body
Once the face is done, it's time to start stuffing! Add stuffing to the head and the body, then start sewing together. Use the ladder stitch method, rather than the whip stitch.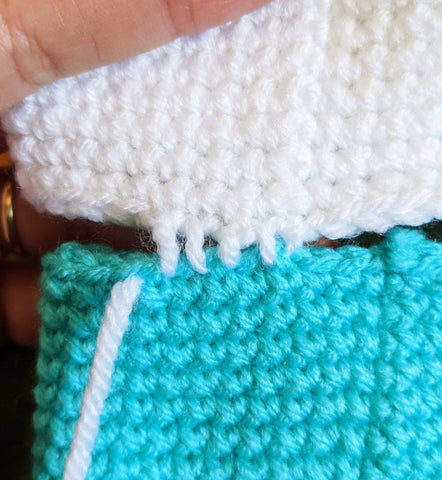

Ears (make 2)
With blue, make a magic ring of 6 scR1: *sc, inc* 3 times (9)
R2-R6: sc entire row (9)
Finish off with a 6 inch tail. Don't stuff.

Bowtie
With black and a starting tail of 8 inches, ch 15, join to first ch with sl stR1-R4: sc entire row (15)
Finish off with a tail of 8 inches. Use both tails to wrap around the middle, making the bow shape, then sew to the bunny.

Sew on the ears, arms, and bowtie


And...you're done!


Alrighty, that's it from me! Shoot me photos of your finished bunny on social media and be sure to let people know where you got the pattern from!
Also, please let me know if you see any typos/mistakes so I can fix them ;)
Tags: bunny, crochet pattern, freebies